Metal Sanding Guide: Achieve a Smooth, Professional Finish
The process varies depending on the type of metal—aluminum, steel, or stainless steel—requiring specific techniques and grit levels to prevent damage and ensure a polished outcome. Tools like sandpaper, power sanders, and lubricants play key roles in achieving a flawless finish, with each tool tailored to different tasks. The right abrasive, such as aluminum oxide, zirconia, or ceramic, is essential for efficient sanding, especially for tougher metals. Regular maintenance of sanding tools is also critical for long-lasting performance and optimal results.
Table of Contents
Importance of Sanding in Metalworking
Sanding is an integral step in many metalworking tasks. It helps remove imperfections, rust, and old coatings, leaving the surface ready for the next phase of your project. Sanding also improves the adhesion of primers, paints, and other finishes and can be used to create textured effects, such as brushed or swirling patterns.
When sanding metal, using the right tools and techniques is crucial to achieving the desired results. In this guide, we will walk you through everything you need to know—from selecting the appropriate tools and abrasives to applying the right sanding techniques for different metals.
Essential Tools and Materials for Sanding Metal
The tools required for sanding metal depend on the size and type of metal you’re working with, as well as the finish you want to achieve. Below are the key tools and materials you’ll need:
Sandpaper
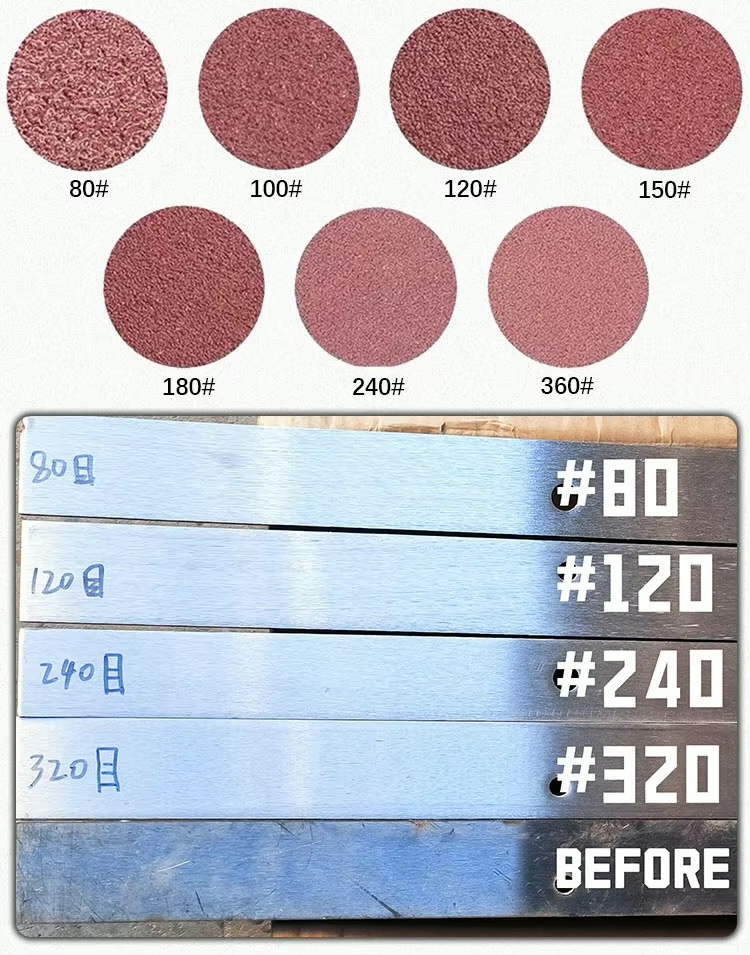
Start with a coarser grit (60-80) for rust removal, old paint, or rough edges. Move on to medium grits (120-180) to smooth the surface, and finish with finer grits (220-240) for the final polish. Closed-coat sandpaper is ideal for metal as it provides a consistent finish and a more aggressive cut.
Power Sanders
For larger surfaces or extensive sanding, power sanders save time. Orbital sanders are versatile and suitable for both coarse and fine sanding, while belt sanders are effective for removing large amounts of material. Angle grinders with sanding discs are perfect for tight corners and hard-to-reach spots.
Protective Gear
Since sanding metal produces dust and debris, always wear safety glasses to protect your eyes, a dust mask to avoid inhaling particles, and gloves to shield your hands from sharp edges and abrasive materials.
Lubricants
Lubricants such as water or oil are essential when sanding metal, particularly with finer grits. They help reduce friction and heat, preventing the metal from warping and the sandpaper from clogging. Wet sanding, which involves using water or spraying a light mist, is particularly beneficial for softer metals like aluminum, copper, and stainless steel.
Step-by-Step Guide to Sanding Metal
1. Clean the Metal Surface
Before sanding, ensure the metal surface is free of oil, dirt, and grease using a degreaser or a mix of water and mild detergent. This allows the sandpaper to make direct contact with the metal for more effective sanding. Dry the surface completely with a clean cloth before proceeding.
2. Choose the Right Sandpaper Grit
- For Rust Removal or Stock Removal: Start with a coarse grit (60-80) to remove rust, old paint, or rough edges.
- For Surface Smoothing: Use medium grit (120-180) to smooth out rough spots and prepare the surface.
- For Final Finishing: Use fine grit (220-240) to achieve a smooth, polished finish.
3. Begin with Coarse Grit Sandpaper
Start with the coarsest grit that suits your task and apply even pressure in circular or back-and-forth motions. For extensive areas, use a power sander, making sure it’s constantly moving to avoid gouges. For edges or detailed spots, consider hand sanding with a block or sponge for better control.
4. Progress to Finer Grits
Once the coarse sanding is complete, switch to finer grits to smooth the surface further. This step helps eliminate the scratches left by the coarser grit and creates a uniform finish. Wipe the metal with a clean cloth to remove dust and assess progress, ensuring all areas are evenly sanded. You may need to repeat the process with progressively finer grits.
5. Use Lubricants for Smoother Results
For fine grit sanding, especially on softer metals like aluminum or copper, lubricate the sandpaper with water or oil to reduce friction and heat. Wet sanding helps achieve a smooth, polished finish, especially on metals like aluminum. For stainless steel, oil can be used to create a mirror-like finish.
6. Inspect and Finalize
Once the sanding is done, inspect the metal for any remaining imperfections. If needed, touch up those areas with fine grit sandpaper. After sanding, wipe the metal clean to remove any remaining dust. For a glossy finish, you can polish the metal with a suitable compound, which will enhance its appearance and add a layer of protection against corrosion.
Tips for Sanding Different Metal Types
Aluminum
Aluminum is soft and prone to scratching. Start with medium grit (120-150) and progress to finer grits (220-240) for a smooth finish. Wet sanding is recommended to prevent overheating and warping. Sandpaper designed for metal is essential, as aluminum tends to clog sandpaper quickly.
Steel
Steel is stronger and can withstand coarser grits. Begin with a coarse grit (60-80) to remove rust or paint, then smooth with medium to fine grits. Keep the surface cool during sanding to avoid heat-induced warping. Move the sandpaper continuously to avoid hot spots and discoloration.
Stainless Steel
Stainless steel requires precision to maintain its polished finish. Begin with fine grit (220) and use lubricants to achieve a smooth surface. Avoid using steel wool, which can leave rust-causing particles. Sand in the direction of the grain for a consistent appearance. For a mirror-like finish, consider using a polishing compound.
Copper and Brass
These metals are soft and susceptible to scratching, so use finer grits (220-240) with gentle pressure. Wet sanding is ideal to prevent clogging and preserve the metal’s shine. After sanding, consider polishing to restore luster, as these metals tarnish easily. For intricate designs, take your time and use small, controlled movements.
Common Mistakes to Avoid
- Skipping Grit Stages: Jumping directly from coarse to fine grit may leave deep scratches that are hard to remove. Always progress through grits gradually.
- Excessive Pressure: Applying too much pressure can lead to uneven surfaces and deep scratches. Let the sandpaper do the work, and don’t press too hard.
- Overheating: Sanding generates heat, which can warp or discolor the metal. Take breaks, keep the tool moving, and use lubricants to manage heat buildup, especially with soft metals like aluminum.
Conclusion
Sanding metal is a vital step in achieving a smooth, polished finish. By selecting the right tools, abrasives, and techniques for each type of metal, you can ensure a high-quality result. Whether you’re removing rust, prepping for paint, or creating artistic textures, following the proper steps will help maintain the integrity of the metal and enhance its appearance. Always remember to prioritize safety and tool maintenance for long-lasting performance and optimal results.
Products Categories
Recently News
Why Choose Us
- 16 years of expertise in CNC equipment production.
- Over 22 years of experience from our skilled technical team.
- Trusted in 100+ countries with 800+ installations globally.
- 10,000 square meter manufacturing facility, equipped for large-scale production.
- A dedicated team of 20+ international sales representatives.
- Round-the-clock support with 24/7 after-sales service.
- A rigorous quality assurance system to ensure top-notch products.
- A collaborative approach fostering success for partners, clients, and staff.
- Comprehensive turnkey solutions integrating manufacturing, service, and sales.
- Designed to handle all types of metal workpieces, meeting diverse industry needs.
Contact Us
- Tel:86-531-88804531
- Phone:86 15562582965
- Email: [email protected]
- Address: Wangtai Gongye Industry, Qingdao


